
The hardest part about any security administrator’s job is finding the right balance between securing their environment and ensuring end users can still do their jobs. By implementing too many restrictions, end user productivity can be impacted. On the other hand, if administrators are too loose with their security policies, it can lead to career-ending security breaches.
This same problem can occur with PowerShell. As we have demonstrated in the previous installments of this series, PowerShell is a potent tool that allows administrators to accomplish a variety of tasks. However, if you take away administrative privileges they are essentially limited to only having the ability to read information. So, how exactly can PowerShell capabilities be locked down enough to ensure security while still allowing functionality? Let’s dive in.
How Much is Enough?
The answer to the question above is simple: Just Enough Administration, or JEA. As the name suggests, JEA is a framework within PowerShell that allows you to very granularly limit what an administrator can or cannot do. In other words, you can limit an administrators capabilities “just enough” to protect your environment, while still allowing them to be productive. The implications of JEA are best understood when framed in reference to specific job roles within an organization. Imagine you had a server admin who was responsible for executing remote PowerShell code on various servers in order to keep them up to date. In those instances, you might want to ensure the admin can run the Get-Hotfix cmdlet, but prevent them from configuring the Windows features on that server. To accomplish this, you could use JEA to prevent that admin from using the Enable-WindowsFeature/Disable-WindowsFeature cmdlets. You could also just use Automox to facilitate all of the patching in your environment. 😉
You're a Wizard, Harry!
You might be thinking “What kind of wizardry is this?! How does it work, and what do I need to offer to the Gods to get it?” The good news is that JEA is baked right into the latest versions of Windows, specifically any version of Windows 10 1607 or Windows Server 2016. So, in short, there are no offerings necessary! Certain older versions of Windows are also supported, provided you install Windows Management Framework 5.1. More information on supported operating systems can be found here.
Other Prerequisites
The only other prerequisite needed for using JEA is to enable PowerShell Remoting. This is easily done using the Enabled-PSRemoting cmdlet:

It is also recommended to enable PowerShell module and script block logging for additional security auditing purposes, however, this is not a requirement for JEA.
Wizardry
This “wizardry” I speak of is actually fairly straight forward. JEA operates by using roles and sessions. This means that all you need to do is define those roles and sessions. The first step will always be to determine exactly what access the different roles within your organization need. As an example, let’s say you want to define specific roles for your Help Desk technicians. Specifically, you want them to be able to start and restart certain services, accomplish basic network troubleshooting, and add users to the Remote Desktop Users group. This can be defined using a PowerShell Role Capability (.psrc) file. A PowerShell session configuration (.pssc) file is then used to define a JEA endpoint. The session configurations determine who is allowed to access the JEA endpoint and what role(s) they will be able to access.
It is recommended to organize these files in a central location in order to easily maintain and modify them. Use the script below to create the directory for you:

Role Capabilities
Create the .psrc file using the New-PSRoleCapabilityFile cmdlet:

Once the file is created, you can use any editor to modify it to meet your needs. For the scenario described above, the key section we would want to modify is the VisibleCmdlets section. It should look like this:

Session ConfigurationYou will notice at the top of the file are informational fields, such as author and description. These can be customized to provide better context and familiarity in the future if someone else will also be supporting your JEA configuration. Some of the other noteworthy sections allow you to configure visible aliases, functions, and even which modules to import when this role is applied to a session.
The session configuration file is created using the New-PSSessionConfigurationFile cmdlet:

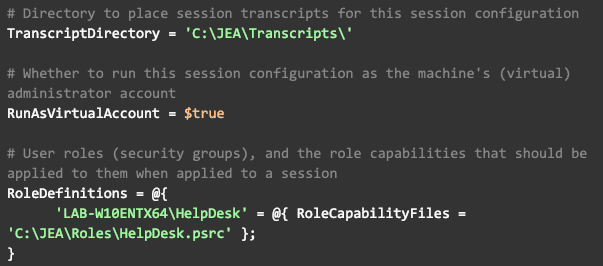
As seen in the Role Capability file, there are a few informational sections here that can be configured for future reference. Aside from that, there are a variety of other sections which can be configured to meet your needs. In our scenario, we want to store session transcripts for auditing purposes. Therefore, we are going to configure TranscriptDirectory with our desired path. Additionally, since our role does not need access to any network resources, we can simply configure JEA to execute commands in the context of the local administrator account. This is done using the RunAsVirtualAccount setting. Finally, we want to define our roles by configuring the RoleDefinitions section. Once all this is done, your configuration file should contain something like this:

Once you are satisfied with your configuration, validate it by using the following cmdlet:
If it returns ‘true’, you are ready to register your session:

What's Next
Now that you’re session is configured, you can connect to it using Enter-PSSession:

In this context, you will only be able to run the cmdlets we configured within our Role Capability file, and you will only be able to connect to it if the user you are running as is in the HelpDesk Group we configured in the session configuration file. However, if your users are full admins they will be able to bypass this by connecting to the default PowerShell configuration which gives them access to everything. You might be thinking “if that’s the case, then how does JEA help?” This is where the “philosophy” part of how to implement JEA comes into play. In the next PowerShell installment, we will dive into the principle of least authority and how we can use JEA to apply its practices and lock our environment down.
About Automox
Facing growing threats and a rapidly expanding attack surface, understaffed and alert-fatigued organizations need more efficient ways to eliminate their exposure to vulnerabilities. Automox is a modern cyber hygiene platform that closes the aperture of attack by more than 80% with just half the effort of traditional solutions.
Cloud-native and globally available, Automox enforces OS & third-party patch management, security configurations, and custom scripting across Windows, Mac, and Linux from a single intuitive console. IT and SecOps can quickly gain control and share visibility of on-prem, remote and virtual endpoints without the need to deploy costly infrastructure.
Experience modern, cloud-native patch management today with a 15-day free trial of Automox and start recapturing more than half the time you're currently spending on managing your attack surface. Automox dramatically reduces corporate risk while raising operational efficiency to deliver best-in-class security outcomes, faster and with fewer resources.