
(Read Post 1: Introduction, Post 2: Useful Cmdlets, Post 3: Organizing Your Code)
Welcome to another installment of the Windows Administration with PowerShell series! This week we will walk through authoring your own cmdlets. As we progress through this week’s post, the benefits of grouping your code into reusable blocks will become apparent. We will also dive into working with RESTful APIs to demonstrate PowerShell’s ability to integrate with a variety of other 3rd party products like Automox.
What is a RESTful API?
Before diving directly into our exercise, let’s talk about RESTful APIs. Also referred to as a RESTful Web Service, these are APIs based on representational state transfer (REST) technology. Unlike SOAP APIs, REST APIs follow more of an architectural style rather than standard. REST APIs can be written in virtually any language. Additionally, any programming language can interface directly with the API as long as it has the ability to make HTTP requests. Because of this, RESTful APIs are a foundational component in allowing PowerShell to integrate with a variety of 3rd party applications.
Real World Scenario #2: Working With RESTful APIs
In this scenario, let’s assume you have been asked to procure a list of servers that are members of a specific group in the Automox console. While the API usage, in this case, is specific to the Automox API, the development process for working with any other API is essentially the same.
Consult Documentation
Typically, vendors with a RESTful API will have documentation detailing use. For example, documentation for the Automox API can be found here. The first step in working with any RESTful API will be to consult documentation in order to familiarize yourself with the APIs use. Specifically, you will want to determine which endpoints you need to use to obtain the information you need. In this scenario, we want to look up information pertaining to servers and server groups within the Automox console. As such, we will be referencing the following endpoints:
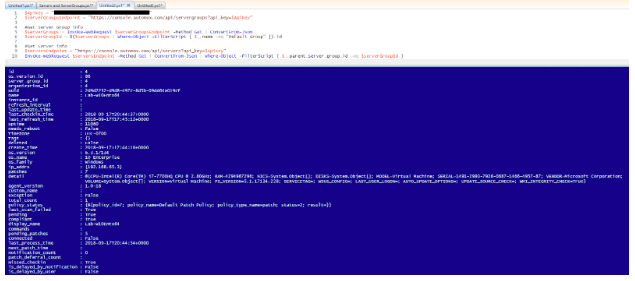
If you attempt to navigate to these URLs directly you may receive an “unauthorized” error message as seen below:

This error is shown because the API needs to be authenticated before accessing any of its services. Most commonly, RESTful APIs accomplish this using API keys which are specific to each user of the product. To authenticate the Automox API, find your API key on the settings page in the console. Using your API key to authenticate is as simple as adding it to the end of the URL. If you then navigate to that URL, you will see that information is returned as shown below:

Invoke-WebRequest and ConvertFrom-JSON
Q: How do we get this info into PowerShell? A: With the Invoke-WebRequest cmdlet. This cmdlet allows you to make an HTTP request to a URL, and return the result into a variable. Since the Automox API returns JSON information, this would result in a very large JSON string in PowerShell variable. Now you have the information, but that does not mean it is in a format that is easy to work with. Luckily, PowerShell provides another tool to help in this case. Use of the ConvertFrom-JSON cmdlet will translate JSON strings into workable objects.
Now, let’s put all of this information into working code:

Here, you will notice that the Get-Member cmdlet was used again to see what kind of data is being used. Upon further inspection, you can see that there is a property which contains server_group_id. Filter the returned servers by the desired server_group_id. The trick here is getting the unique id for your desired server group. This can be accomplished using the same methodology as above. Change the endpoint URL to that of the server groups endpoint:

The results show the id property of the server group. This relates directly to the server_group_id of the server objects. Before we can filter on that, however, we want to make sure we have the correct server_group_id. To do so, filter the returned data by the name of the desired server group. Then, use the id to get the desired servers:
The servers returned will be the servers that are members of your desired server group. At this point, we have technically met the requirements for our scenario. However, there are ways to make this code more efficient and reusable. Let’s dive into writing your own cmdlets:
Authoring Cmdlets
The good news is that writing your own cmdlets is pretty straightforward. Fortunately, we have already completed the hard part. The only thing left to do is to wrap the code up in a few functions and properly document them. Something to consider here is how you plan to use this code in the future. You could put all of what we wrote into one cmdlet and it would work. However, that would make it a very specific solution to this scenario. Instead, organize your code into modular cmdlets to prioritize versatility.
We will be writing two cmdlets, one for servers and server groups respectively. In order to do so, we will isolate the code into the pieces we need. First, we will start with servers and place it into a function. Be sure to use a descriptive name for your function, preferably following the ‘Noun-Verb’ naming standard. When making a request to the Automox API we want to return that value to whatever has called the cmdlet:

As mentioned before, modularity is key. If we leave the api_key hard-coded within the function it will only be useful for you. Additionally, if your API key were to ever change you would need to update any functions where it is hardcoded. To avoid this, we want to add the API key as a parameter. This way, it can be passed to the function whenever you need to use it.
Parameters
Parameters are a foundational component of cmdlets. They allow you to pass information/variables to the code inside your functions. The framework PowerShell has in place is extremely robust and allows for granularity when defining how parameters are passed. This can be as simple as defining which parameters are mandatory, or as complex as grouping parameters together into parameter sets. For this scenario, we will be defining the API key parameter as mandatory:

The final step is documenting your cmdlet. This was covered in last weeks post, but let’s add that into this cmdlet to finish the entire process before moving onto the next:

That’s it! You have officially written your own cmdlet and documented it properly. Up until now, we have walked through our exercises step-by-step. However, for the next cmdlet, we are going to switch things up a bit. As a PowerShell admin, you need to practice reading code that you are not the author of just as much as you need to practice writing your own code. Therefore, I have posted the second cmdlet below for review. If you have any questions, feel free to email me at nick@automox.com.

Real World Scenario #2: Working With RESTful APIs Using Our Cmdlets
In order to further demonstrate the benefits of using cmdlets, let’s revisit the first scenario. This time, we will leverage the cmdlets we wrote:

As you can see, the code returns the same data. However, the implementation is much simpler. The cmdlets we wrote can be used in a variety of different scenarios to interact with the Automox API, saving you a lot of time on any future development that may be needed.
Next Week’s Installment
Patching is only one part of cybersecurity hygiene. Another key part is the enforcement of certain configurations on your machines. In the next installment, we will be covering common configurations that PowerShell can help you enforce, further ensuring the security of your environment.
About Automox
Facing growing threats and a rapidly expanding attack surface, understaffed and alert-fatigued organizations need more efficient ways to eliminate their exposure to vulnerabilities. Automox is a modern cyber hygiene platform that closes aperture of attack by more than 80% with just half the effort of traditional solutions.
Cloud-based and globally available, Automox enforces OS & third-party patch management, security configurations, and custom scripting across Windows, Mac, and Linux from a single intuitive console. IT and SecOps can quickly gain control and share visibility of on-prem, remote and virtual endpoints without the need to deploy costly infrastructure.
Experience modern, cloud-based patch management today with a 15-day free trial of Automox and start recapturing more than half the time you're currently spending on managing your attack surface. Automox dramatically reduces corporate risk while raising operational efficiency to deliver best-in-class security outcomes, faster and with fewer resources.
)
)
)
