
(Read Post 1: Introduction and Post 2: Useful Cmdlets)
Welcome back to the Windows Administration with PowerShell series! If you have been following along with this series, you are likely writing some functional code. That’s great! However, as your skill continues to grow you will find that writing scripts becomes more complex and harder to manage. Although this is an inevitable outcome, it’s important to ensure that your code is scalable and can be supported in the future. Keeping that in mind, consider the following assumptions:
- At some point in time, someone else will have to use/debug your code.
- Not everyone will be as good at PowerShell as you are (unless you point them to this series (; ).
- Just because you wrote the code does not mean you will understand it in a year’s time.
While every environment is different, the majority of you will find yourselves in environments where the above assumptions are true. As such, it is key that you develop your scripts in a way that prioritizes not only functionality but also readability. There are a few concepts that you should be familiar with as you proceed.
Document Your Code
Documentation is key to ensuring the supportability of your code and has a direct impact on mitigating the assumptions listed above. The more documentation that is created, especially around complex code, the easier it will be for others to understand. Additionally, documentation significantly reduces the times it takes to interpret the code when it is time to revisit it. Powershell offers a variety of features that help with this.
Basic Commenting
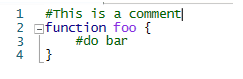
Basic commenting is accomplished in PowerShell using ‘#’. In ISE, anything after the ‘#’ will be green to indicate it is a comment.
You can also use the ‘<# #>’ syntax to comment on multiple lines, accommodating any longer documentation you may want to write.

Regions
Regions are another useful tool that allows you to group together code into modular chunks. These look like regular comments but have the added benefit of allowing you to collapse and code between the relevant tags.

Get-Help Documentation
As mentioned in the latest installment, the Get-Help cmdlet is an extremely useful tool that returns additional information regarding some other cmdlet. What does this have to do with documentation? When you write your own cmdlets you can provide documentation which allows Get-Help to return useful information.

Given the above documentation, your Get-Help cmdlet will return the following:

The more information you put into your documentation, the more detailed the return will be.
Don’t Replicate Code, Use Functions
Replication of code is another thing to avoid when developing scripts. If I am ever using code in more than one place, I throw it in a function.
Consider the below code:

This code is extracting the icons from four different application installers. Both of the above examples do exactly the same thing. However, the example on the right utilizes a function to remove the need to duplicate code. Additional benefits of using functions include:
- Readability: The code on the right is much easier to understand than the one on the left. Using descriptive function names when writing functions ensures other administrators have an idea of what the code does at a glance.
- Supportability: Imagine the code inside your function has a bug. With the code on the left, you would need to make any mitigating changes multiple times throughout the script. In the example on the right, you would only need to make the change in lines 4 and 5.
- Modularity: Functions allow you to easily reuse code wherever it is needed. In the above example, instead of having to reuse two lines of code to extract an icon from a file, simply call the function. This is a small example, but keep in mind that more lines of code can be saved the more complex the function is.
Just Because You Can, Doesn’t Mean You Should
PowerShell gives you the ability to accomplish complex tasks in as little as one line of code. This is a great feature, and admittedly very fun. However, just because you can doesn’t mean you should. For example, consider the code below:

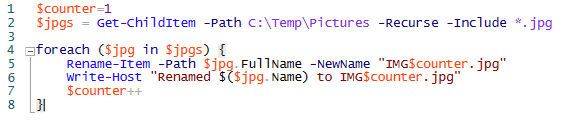
This code looks for all JPEGs in the provided directory and renames them to IMG1.jpg, IMG2.jpg, etc. This is great, but imagine supporting a script that is full of one-liners, just like this one. Sure, there is maybe only 10 lines of code in the entire script, but each line looks like a foreign language. In a previous post, we talked about aliases which are great when there is a need to run a few commands in the console. However, when used in scripts, they contribute to the lack of readability and supportability. Let’s write the same code again, this time avoiding the use of aliases and splitting it up into a few lines.
Notice how much easier it is to follow the code. In summary, we improved the code by:
- Removing the use of aliases
- Adding the use of named parameters
- Splitting the code into multiple lines
This makes the code much more legible, particularly for those who may not have extensive experience in PowerShell. One caveat worth mentioning is that “just because you can, doesn’t mean you should” works both ways. Sometimes it is cleaner to write certain code in one line, as opposed to splitting it up into multiple lines. As the developer, it is your responsibility to use your best judgment when writing code to determine the best course of action.
Next Week
The last installment mentioned that this week we would be discussing the creation of your own cmdlets. If you’ve gotten to this point in the post, you already know that it focused on the organization and documentation of code. I wanted ensure that this was discussed prior to cmdlet development because it is a key success factor. It will also be a key factor throughout rest of your PowerShell career. As such, we will be discussing the development of your own PowerShell cmdlets in the next installment.
About Automox
Facing growing threats and a rapidly expanding attack surface, understaffed and alert-fatigued organizations need more efficient ways to eliminate their exposure to vulnerabilities. Automox is a modern cyber hygiene platform that closes the aperture of attack by more than 80% with just half the effort of traditional solutions.
Cloud-native and globally available, Automox enforces OS & third-party patch management, security configurations, and custom scripting across Windows, Mac, and Linux from a single intuitive console. IT and SecOps can quickly gain control and share visibility of on-prem, remote and virtual endpoints without the need to deploy costly infrastructure.
Experience modern, cloud-native patch management today with a 15-day free trial of Automox and start recapturing more than half the time you're currently spending on managing your attack surface. Automox dramatically reduces corporate risk while raising operational efficiency to deliver best-in-class security outcomes, faster and with fewer resources.